
Inputs Tab
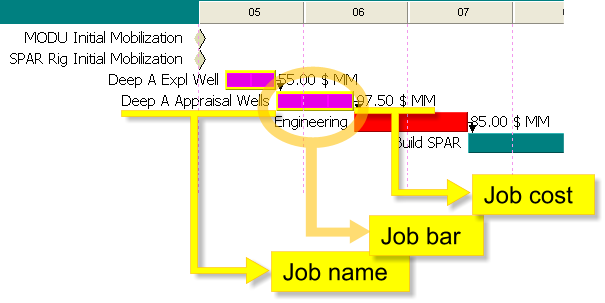
The Inputs tab allows an overall view of all the jobs defined in a project prior to actual simulation. Jobs are represented by shapes, usually horizontal bars, placed in separate rows; information concerning a particular job is always placed in the same row (name on the left, estimated costs on the right).
Click image to expand or minimize.
You can drag-and-drop jobs and summaries up and down. This does not modify the scheduling itself, but helps to organize jobs visually.
The position and length of the shapes on the horizontal axis represent the jobs over time, where the years of the simulation are marked at intervals in the top of the pane. This axis can be zoomed in/out at will; see Commands available below.
If for any reason the expected duration of a job extends beyond the project end date, this will be indicated in the Inputs tab by means of a pink area labeled Beyond simulated time:
.png)
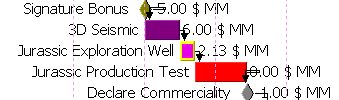
Shapes and Symbols
- A
 bar stands for jobs for which a duration can be defined, represented by the length of the bar. However, when a duration zero is entered for these jobs, the bar is replaced by a
  large circle.
 - Most jobs without a definable duration are represented by a
 diamond, except forAbandonment jobs which use a
  red circle with an "x" instead.
 - A
 black bar with triangles stands for a Summaries.
 - A deactivated job appears with its name, duration bar and costs grayed out:

Color Coding
Different kinds of jobs are distinguished by means of a color code:
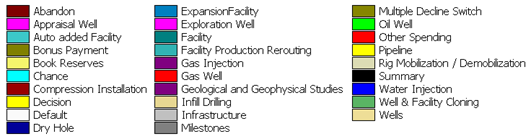
These colors, as well as the background, can be modified and re-defined; see the  Colors command under Commands available.
In the case of Well Drilling and Well Completion jobs, since it is possible to include multiple wells in a single job, it is possible to have more than one kind of well, and therefore the bar will exhibit different colors, perhaps with a different expected duration each. In the following example, job "Wells drilled at Well Pad" contains two oil wells, then one water injection well, then another oil well and finally another water injection well:

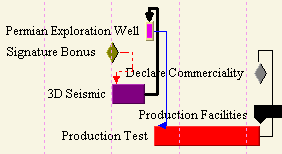
Linked Jobs
Scheduling relationships between jobs (see Scheduling Pane) are represented by means of lines connecting them. E.g., a condition like "Job A starts after Job B is finished" is expressed by a line which goes from the end of Job B to the beginning of Job A. Link lines can be activated / deactivated from the Options (see Commands available below).
By right-clicking on any line you can choose from a variety of styles for tidying up your Schedule (width, style, color, start/stop direction and shape.)
Modifying Starting Dates and Durations Manually
In the Inputs tab you can also modify the starting date and the duration of jobs manually. You can move jobs horizontally to a new starting date by drag-and-dropping it while pressing the ALT key.
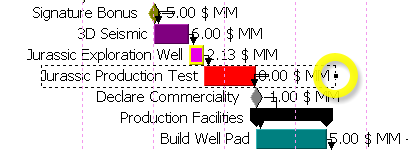
To modify the duration of a job, you must first select a job by left-clicking on it. A selected job is marked by means of a dashed box; if the job has a definable duration, this will be marked by the presence of a black point at the right of this box.
To modify a duration manually, just grab the black point sideways.
The starting date of a job cannot be modified in this way if this starting date is already dependent on a different condition (e.g., it is linked to another job); also, modifying either the starting/ending date or the duration of a job will affect the starting dates of jobs depending on it.
Also, note that apart from manually modifying dates and durations in this way, the highest precision is achieved by entering them directly in the Scheduling Pane.
Multiple Selection
It is also possible to select several jobs simultaneously, by keeping the CTRL key pressed while selecting elements, or by drawing a box with the mouse pointer:

When more than one job is selected, only the  Delete, Summarize in and
  Deactivate / Activate commands are available (only Delete if the selection includes summaries).
Commands Available (Inputs Tab)
A series of commands is available by right-clicking either on the pane or on the Schedule section of the tree, and also in the Edit Menu. Besides, a selection of the most usual commands is provided by the button bar at the bottom.
The list of commands available varies. If no job is selected, the available commands are:
 Add: Open a dialog to create a new job (see Kinds of Jobs).
 - Expand / Collapse all summaries: See Summaries below.
- Options: Select data to be shown and layout: Show cost data, Left justify Event Names, Show grid lines, Show linked event lines.
- Colors: Display the current color code selection (default colors are as shown in Color coding) and re-define colors for specific jobs. Use the Apply button to preview the changes.
 Font: Choose a different font, style, size and script to be used in the graphic panes of the Schedule. Note that this only affects the text in the Inputs tab and the In Last Simulation tab; for adjusting the setting of other pieces of text in the interface see Options (Tools menu).
 - View -

- Zoom In,
 Zoom Out, Zoom to Fit: Change the horizontal display. You can also use the mouse wheel while pressing CTRL. Additional commands are also available on the right of the Button Bar:

 Zoom to Fit adjusts the window to the whole time-span of the project, which is the default display;
  Zoom Region allows selection of an area to zoom; and
  Previous Zoom reverses to the previous view. These options facilitate the visualization of details in large projects.
 Copy Schedule Image To Clipboard: Copy the whole schedule plus the timeline bar to the OS clipboard in two formats: as a Windows metafile (vector format file) and as a bitmap.
When a job is selected the following commands become available:
 Edit: Open the node for the selected job. Only available in the Button Bar; in the main pane, this is done by double-clicking on bars, and in the tree by just clicking on each job node.
 - Delete: Permanently erase the selected job from the project.
- Rename: Change a job's name.
 Insert: Create a new job immediately above the one selected. Similar to the Add command.
 - Move: Open a dialog to move the job up and down the Schedule. (Same as drag-and-dropping the corresponding bar.)
- Summarize in: Move this job into an existing summary, or create a
 New Summary.
 - Deactivate / Activate: Set the Perform Task variable to True or False, for which see Scheduling Pane. Note that you cannot define this variable as a function from the Inputs tab, and that if it is defined as a function in the Scheduling pane the option will be disabled in this tab.